Sunday, October 24, 2021

Yakima or Bust!

Now is our time to finally make it to Yakima, Washington and visit Gari's side of our family.  With abundant construction delays this season in Idaho, we didn't know if this trip was going to be possible.  It looked like the weather may close our window of opportunity with all the construction delays.  But, alas we are here in Yakima as this post hits the blog!  We are getting lots of rain from the record low pressure moving over the northeast currently.  The moisture is much needed here in the Yakima Valley so it is indeed Heaven sent.

Below are some of the last pictures we took at our Eagle View Project.  Gari checks grade as Troy moves the dirt/rock piles around the new foundation.  Mt. Baldy shows a little snow signaling that it is time to think about a departure.

Looking out our east driveway:  We repurposed the clean out concrete left from the multiple foundation pours.  The edge slope on the built-up drive at the road curb is quite tall and steep.  We figure that the concrete should help to hold everything in place.  We had planned on bringing in more material to soften the slope, but this waste concrete was free, so why not try this approach?  We worked the concrete with our shovels to get the finish we desired!  A real hillbilly operation :)
The shot below shows the steep edges a little better.
Looking west back toward the project site:  We kept our No Trespassing signs up to warn people of the dangers around the construction site.  Hopefully that will be enough to avoid any calamity this winter.
We set steel Tee-Posts around the perimeter of the crawlspace pit.  We tied rope and caution tape between the posts to warn anyone getting too close to the open pit.
In the shot below, looking west, you can see the caution perimeter a little better.
Gari is last one out of the Shop before we hit the road.
As The Gentle Giant, Don Williams sings, 'It's hello blues, and down the road we go...' heading out across western Idaho and eastern Oregon...
We landed for the first overnight at a little BLM spot on the west bank of the Snake River in eastern Oregon.  Those that know us, remember that we always like to sip our coffee on the banks of the Snake River!

A little view from down on the bank of the river.

Back on the road, day two.... moving through eastern Oregon.
A little Fall color around the corner...
Another corner, more color...

Here we go, down the big hill into the Columbia River Valley and into Washington State.

In a week, we will be climbing up this big hill going back to the east on our way south for the winter.
There she is, the Mighty Colombia River!
Below you can see the McNary Hydroelectric Lock and Dam facility.  In the foreground you can see the fishing boats.
No sooner than we arrived at our spot in the Yakima RV park, when Jerry showed up to greet us.  Gari shares pictures of our construction project in Idaho and stories with dad.


Thursday, October 14, 2021

Ding Dong the Roof is Done... Kinda

We finally got the roof finished for the year.  There are still a few details that need rework, but we are in good shape to leave it over the winter we believe.  We finished the gable end rake trim last week.  Now it is all installed with the proper Z-Closure, sealed with mastic and covered with the rake trim.  We still need to get about 30 pop rivets installed to ensure that high winds, snow or ice will not un-hem the rake trim.  Some installers don't install the pop rivets, but we will get that done in the spring, even if we have to do it ourselves.  Yesterday we talked the construction company into sending Brandon back out to install the ridge cap.  That is the last piece we need in order to depart for the winter and go visit with Jerry in Yakima.  

The company had to juggle a few things around in order to send Brandon out, and we insisted that they do.  They did.  Brandon came out with a new helper Brock; said he was on the way to Rexburg on another job when he was called and told to come out to our place.  They should have been here without the prompting, but if that's what it takes we will deliver!  Brock was a good young man of 17 y/o, said it was his second day on the job.  That means Steve would be on the roof again.  Sure enough Steve worked up top with Brandon while Brock and Gari supported from the ground. 

Steve and Brandon inspect every closure and ensure the seams are sealed with silicone and that the filter material is positioned over the entire length of the vent.  Most of this job was preparation.

Brandon bent the end caps so they will flash over the gable peaks.  Something the original install crew neglected to do.
It was a clear day, first we have had in several days.  It is snowing again today.  It is forecast to be in the high 50's next week so we think we should be able to depart without issue.
Brandon carries the first cap piece to it's place at the north end.  Steve hangs on the roof for dear life.
Brandon works the rubber mallet while Steve caulks holes, seams and overlap joints.  This is the second to last piece.  We spent about 4 hours on the roof.  Not the most fun day, but the results are very rewarding.
Flashed Gable Peak, that's much better.
Steve installs two gasketed screws in the gable end flashing.  That metal isn't going anywhere but where it is!  Working over the edge like that is no fun.
All finished, time to cook... and to tell the rest of the story.  While we did finally get the ridge cap installed, the bent up metal arrived with a defect.  The edges of the cap have a hem bent over that hooks onto the edge of the Z-Closures installed at the roof peak.  Unfortunately the metal supplier bent the hems absolutely flat against the metal cap and the Z-Closure edge would not go into the hem.  We had to field modify the ridge cap pieces by prying a little space back into the hem.  Wouldn't you know it, the metal at the fold began to yield, that is break.  We caulked the spots that we could see were broken, but we are certain the entire cap is compromised at the hem and must be ultimately replaced... again.  We pop riveted the cap in place so it should stay there over the winter, and we will just have to repeat the process next spring when we return.


Tuesday, October 12, 2021

Past Time

We had planned to be gone from Swan Valley by now, but our shop builders have dragged their feet into the weather change and we now we wait for the weather as well as the builder to behave.  It sure is pretty though watching the season change.  Below are a few pictures that we have captured in the last couple of weeks.

A scene from along the south bank of the Snake River.

A braid in the South Fork of the Snake River.
More scenery along the south bank.
Headed down into the river valley just west of Swan Valley along Rt 26.
More color ascending into the hills.
On the road home, we can just see the Shop...
Surprise!  It snowed an inch or two last night.  That will stop the roof repair work.
The horses across the road stand out in the white landscape.
We can just see the peak of Sheep Mountain sticking out above the low clouds.
The water system is still flowing!  The deep burying this summer pays off!  Mt. Baldy behind.
We worked with Troy our excavator man in the rain and sleet yesterday.  He back filled around the foundation and we extended the electric conduit and RV sewer dump on the close side of the house foundation.  You can see the two stubs sticking up now right at the foundation.  That was no fun gluing the large conduit down in the muddy and wet trenches yesterday.  It will be nice to have electric and sewer, but we are glad that job is finished!
Lots of snow on the roof.  Hopefully it will be gone in a day or two...  Troy has the wrap porch area filled in.  We will let it settle over the winter and pour the slabs in the spring when we return.

Friday, October 8, 2021

Concrete Finished for the Year

We are very happy that we were able to get as far as we did with the house foundation work this year.  We were thinking as late as early September that we would not get any of he foundation started.  But alas, Rob and Troy came riding in at the end of the first week of September and worked consistently over 4 weeks, completing four separate pours to get us to the point where are are now and stopping for the year.  A big thank you also to Excavator Troy for opening up the large areas in an outstanding way.  All we lack now is the flat work of the garage slab and the wrap porch slab.  Rob said that he will probably accomplish that with two separate pours... and that will take place in the spring when temperatures get above freezing again.  With that, the house will take six separate pours.  Designing in the concrete wrap porch certainly added a lot of complexity to the construction, and we are hoping having a choice of sitting on three sides to get the right mixture of sun, shade and breeze will be worth it in the end.  We have great dreams of some fantastic porch time in the future; we hope you will be here to share it with us!

Crawlspace walls completed, view looking east below.  The walls will give us about 4 feet of overhead space inside the crawlspace.  Our design hangs the floor joists inside the crawlspace walls such that the house floor will be flush with the top of the concrete walls.  This eliminates steps into the house without having to live on a concrete slab.  We also plan to encapsulate the crawlspace, which means no vents in the crawlspace walls.  The propane fired air handler will be installed in the crawlspace, so we should have plenty of overhead room down there to work when necessary.  This will also make it easy to condition the crawlspace area, giving us a sort of heated floor without all the complex plumbing.

Crawlspace walls view looking northeast.  A dusting of snow already on Mt. Baldy in the distance.  The garage will go along the wall in the foreground and the wrap porch will be on the Mt. Baldy side.
Excavator Troy begins to open up the footing area for the porch frost walls and garage walls.
One of the jobs we had to complete prior to pouring footers or walls for the porch & garage, was to extend the sewer effluent into the house.  We used 4" ABS which seems to be standard around here.  The ABS is a bit more durable and flexible than the PVC alternative.  Additionally we sleeved the 4" ABS with a 6" PVC pipe underneath the porch footing and wall.  We did this for future maintenance if necessary, and should not have to remove any of the concrete porch to replace that main line.
Gari stands ready to bed the main sewer line with 3/4" gravel.
Don't forget to get the drainage slope right, 1/4 bubble should do it!.
Main sewer line and sleeve all sealed up through the crawlspace wall penetration.

Main sewer line all bedded in, ready to add footing forms.

Steve runs the laser level rod while Troy finesses the footing trench.
View of completed porch and garage footing trenches.
Gari measures to locate the top of garage and porch concrete slabs relative to the top of crawlspace wall.  Looks like a 4" step up.  Just about what we had planned.
View of completed porch and garage walls footing forms.
Concrete Troy takes a quick break before installing the last garage footing form board.
Completed garage and porch wall footing forms below.

Northeast view of completed footing forms.

Looking west.
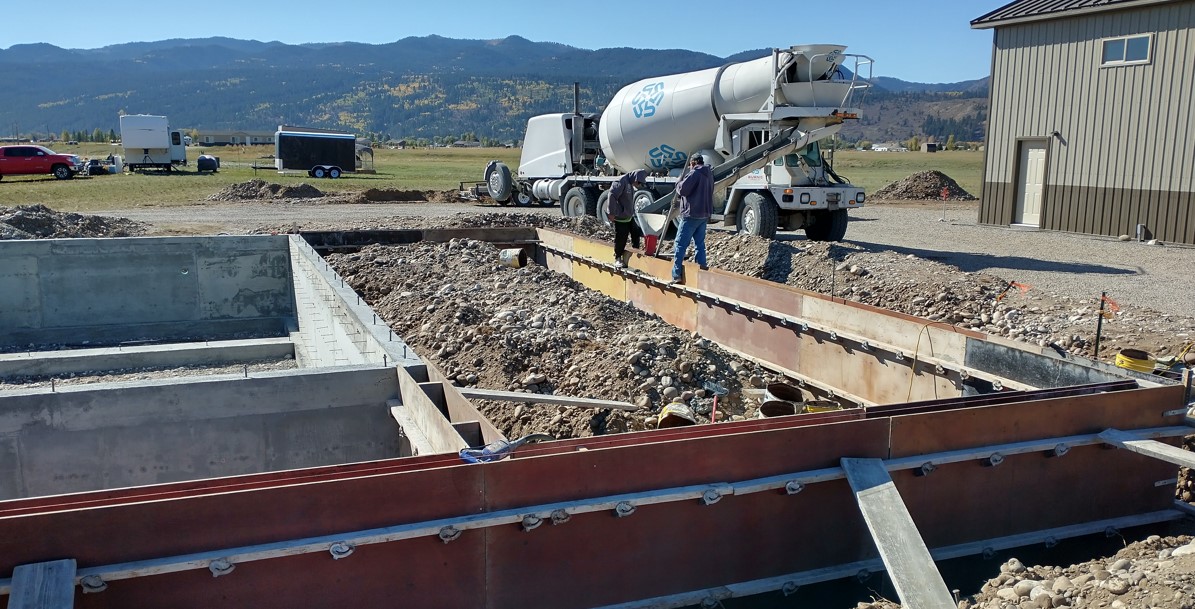
Pouring garage & porch footings!  Second truck in queue...
Rob checks over the completed pour job... looking southwest.  Tie steel installed in footings.  This will tie the footings to the walls.  Very nice work, exactly to plan.  It is amazing how often that does not occur and the inspectors just pass it right through.
Looking southeast, garage area in the foreground.
Porch and garage wall forms going up now.  Rob braces the wall plumb with a Kicker board.  These kickers allow the guys to get onto the top of the wall forms during pouring without much effort, and hold the wall in place at the same time.
Pouring walls!  Looking west.
Garage area, exterior wall being poured.
Last wall at the south porch.  Rob tamps the concrete down into the form whilst Troy smooths and levels the wall tops with his magnesium trowel.

Porch frost wall and garage wall forms off, looking west southwest.

In the view below you can see the two personnel door notches that will allow access into the garage from the outside.  One door will be at the end of the porch at the north or left frame below.  The second personnel door will be on the west exterior wall or frame right below.  The garage slab will cap over the notches and make the threshold of the door flush with the slab floor.  Likewise, the porch slab will cap the porch frost wall for a clean finish appearance. The theory of the frost wall is that it will help to prevent any frost heaving underneath the porch slab.  Concrete is now finished for the year.  We will pick up this thread next year when the flat work (porch and garage slabs) goes in.  We have some excellent details planned for those pours.