Tuesday, January 29, 2019

50th Street

This year we are parked on a new lot located on 50th Street in the Yuma Foothills.  So far a month has gone by, in what seems like the blink of an eye.  We have already visited the eye doctor and received our new glasses for the year.  Steve learned that he has an ingrown eyelash.  We never heard of that, but apparently it's a thing for us old farts.  The Doc said that he has seen these before, but usually it's the entire row of lashes!  I guess it could be worse...

A view from the roof on 50th Street; Gila Mountains to the North.
The first project we worked was getting Alan and Janice's galley slide out the day after we all arrived in December.  Steve measures the slide extension to ensure it is going out square and not binding.
Alan works the blocking and hydraulic jack below the slide.  He stops to document the blocking configuration in case this procedure is required again in the future.  The good news is we got the slide out with lots of effort from all four of us.
We have been dancing regularly this year.  This shot below is at the Caravan Oasis RV Park.  They have both kinds of music there... Country AND Western!  We Two Step, Waltz and are working on our Polka.  Great exercise and fun in the evening.
Gari takes a twirl on the dance floor with Dad Jerry.
Another early project was the Raising of the Cabana.  Steve and Alan show off the finished product below.  There will be many meetings in the Cabana we predict!  Many starting at or even before 5 o'clock....
A few shots of the build action below:  Steve presents Alan with Arc 2A....
Steve and Alan work on assembling the center truss sections.
Alan experiences the challenge of keeping Steve focused. 
Gari and Alan add the arc sections to the center truss assembly.
Alan and Steve begin to lay out additional arc sections to the basic roof structure.
 Working the arcs....
Steve and Alan trade positions on the arcs.
Jerry and Janice come out an get involved with the canvas installation.
The Cabana all set up and ready for 5 o'clock somewhere...
Below a view from the back of the 50th Street lot.
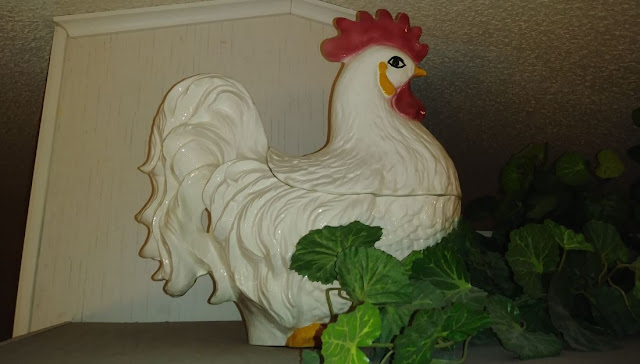
Jerry is in the process of selling his Yuma house.  He sold it as is including all contents.  The picture below is of the refrigerator chicken we have named Marty.  He is a fine chicken.  I captured this image in honor of the love my sister Judi has for chickens.  We will miss you Marty, we had some fun times in this kitchen!
Sister Sandi came to visit...
...with Cousin Cathy, all the way from Yakima, Washington.  These two really livened up the place while they were here.  We all had a blast.
Below is a shot of Poly.... (Polydactal) the seven toed cat; one day she visited us on our 50th St lot.  She wears a tracking device, so Colorado owner Ilene can find her when she goes visiting.
Heater hair removal project.  A stinky job.
All cleaned out and ready for action again.  We shouldn't be needing this thing much past January.
Warning - Possible Disturbing Image below!  - - Had to include a picture of Steve's ingrown eyelash.  The Doc let Gari look at it through the microscope.
Mid January near full moon rising over the Gila Mountains.... Waxing Gibbous
The time may pass quickly down here in Yuma, but everything moves slow.... Halloween decorations still hang in the tree behind our lot.
And we bring this post to a close with a shot from the wash behind our 50th St lot looking east toward the Gila Mountains.  The tallest peak to the right is Jenkins Peak.  There is an American Flag up there with a solar powered light that is visible at night.  One day we aim to climb that mountain, mountain, mountain....

Tuesday, January 22, 2019

Soft Water and Other Things

We are just hanging out in Yuma, doing some projects and enjoying our time here.  One maintenance chore that we repeat is recharging the water softener.  It is an ion exchange system.  The theory is that hard water passes through a filter media that is negatively charged via sodium ions which grabs onto the positively charged hard water contaminates such as calcium and magnesium.  Below we will post most of the steps required to recharge the softener.  Here in Yuma we need to recharge the softener after about a week; the water is very hard here.  The soft water does a few things for us.  It significantly reduces the calcium and scale build up on our valves and plumbing fittings in our trailer.  That greatly extends the life of these components.  It also greatly reduces the amount of soap that is needed to do the everyday washing chores.  Once you have soft water it is easy to become accustomed to it and cause you to dislike hard water.  We're hooked.

Steve points out the small upgrade we recently did to our water softener.  We replaced the original plastic fittings with nice brass fittings, including a nice brass quarter turn ball valve on the output.
Close up on the new brass hardware.
After removing the softener from the inline water hoses, the first step to regenerate is to open the top.  It is a screw on lid with an o-ring seal.
Once the o-ring seal is broken, the cap screws off very easily.
Some of the filter media, tiny resin beads, are present on the top of the softener and inside the lid.  We use a cup of water to wash the beads back into the softener and this also provides a surface that is optimum for the o-ring seal.
Don't forget the inside of the cap, which is where the o-ring is captured.
Next step is to pour a standard box of salt into the softener.
We keep the cup of water handy when the salt clogs up the opening in the softener.  The water washes the salt down and we can continue pouring the salt.
Once all the salt is in the softener, we fill the remainder of the softener with water from our cups.
Then simply replace the lid.  We close the output valve and cap the input fitting...
Then we give it a good shake and break up the filter bed.  The resin beads tend to clump as the water becomes harder. 
We let the softener sit for an hour or so and give it a second shake up half way through the waiting period.  When the waiting period is complete, we hook the hose back up from the water hydrant and trickle water through the filter for about 12 minutes.  Once the salt taste is gone from the water the softener is good to go again for another week in Yuma.  Elsewhere we get a couple weeks and sometimes even more out of one regeneration.
Normally we set the water softener underneath the slide skirt up against a wheel hub.  It is shady under there and protected.  Here in Yuma, we set the Softener right behind the water hydrant and electric stand.  We wrapped the softener with shade screen and used small spring clamps to hold the screen in place.  You can see the 10" cartridge water filter under the nose of the red kayak.  This arrangement makes it a little easier to get at the softener for regeneration day, and Yuma has more generation days than anywhere else we have stayed.  In all this arrangement has worked out well for us and does make the regeneration process a bit easier.  The other thing you can see in this picture from the bottom are the flexible sewer hose which we run in standard residential plastic gutter and even cap with the same gutter to shade UV and protect from pecking birds.   The gutters set up easily and give us a nice constant slope to the sewer connection.  The thick black line is the 50A hookup cable, we shade that with foam pipe insulation from Lowes.  The blue hose is our fresh water into the trailer, we usually shade that hose with pipe foam as well but have not gotten around to it yet.  The red hose is the back flush for the black tank.  This way when dumping we don't have to change hoses, simply turn 1/4 turn ball valves.  There is a Y-splitter hose fitting with two ball valves on the output of the 10" cartridge filter.
Last project on this post; a door kick plate.  The exterior door to our trailer has suffered some degradation. The faux soft touch leather lining the interior of that door has started to break down in the lower hinge side corner.  You can see the scourge below.
We purchased a Schlage kick plate from Build.com  Below is a screen shot of the item.


We decided to try and fit a standard kick plate over the degradation and even slip it behind the angle at the perimeter of the door interior.  Steve holds the plate below.  We thought the plate may be thin and soft enough to just score with an awl to cut to length.  Turns out it was thicker and harder than anticipated, so the awl scored the line and the cutting was accomplished with a hacksaw and new blade.  It cut easily and cleanly. We cleaned it up further with a file prior to fit checking and final install.  We purchased a 34" plate for our 30" door to be sure it was long enough to go under the door angles on both sides.  We knew we would be trimming the size and cut a small amount from each side to keep the mounting screw holes symmetric on the door.
Gari performs QA on the installed product.  We couldn't find a black plat to match the door metal and screen door plastic, but this plate is Aged Bronze and seemed close enough for trailer work.
Wide view of finished product.  WE think it is an improvement on the degraded soft touch material.
 Close in view of finished installation.  It is noted for detail that the top screws seemed to only go through an 1/8" plywood, whereas the bottom row of screws definitely bit into metal.  The oval head screws come with the plate and we drilled a very undersized pilot hole and were very careful not to over torque especially the top row of screws.


Friday, January 18, 2019

Solar Junction Box Replacement

We have been experiencing water intrusion into our AM Solar junction box on our 2013 Majestic for over three years that we know of.  We added caulk to the lid screws and to the cable gland entrances, but still experienced water intrusion into the box.  We finally decided to just replace the entire box when we opened it up this fall and found water right up to the buss plane.  The corrosion was terrible and it was obvious that most of the box assembly was not suitable for cleanup and reuse.  Our 2013 New Horizon Solar Option we believe was an AM Solar kit of four each 100 W solar panels and the Tristar MPPT-45 charge controller.

Below is the before photo of original AM Solar junction box on the roof.
After photo of the replacement junction box below.  By assembling our own box parts, we saved about $70.
We believe that the original AM Solar box is found for $80 at  https://amsolar.com/rv-combiner-box/20-roof
We are unsure if the cable entrance glands come with the AM Solar box, but we know the cable glands on our original box did not have a rubber gasket or o-ring between the gland shoulder and the exterior box wall.  We suspect that is where most of the water was getting into our original box.  We also note that the AM Solar box did not have a o-ring gasket on the lid, which makes that box more of a dust-proof rather than a weather-proof enclosure.

Photo screenshot of AM Solar box for sale online below.

We found a generic project box on Amazon for $12.  It turned out one of the four lid screws was missing upon delivery, and we wrote that in a review online.  The seller immediately contacted us and provided a complete refund.  That saved us about 1/3 of the cost for a completed new box assembly.  The lid screws were zinc plated, so we just replaced all four with stainless steel screws from Ace Hardware.  We found the box here https://www.amazon.com/LeMotech-Waterproof-Dustproof-Universal-Enclosure/dp/B075X11CL6/ref=sr_1_5?s=hi&ie=UTF8&qid=1545005088&sr=1-5&keywords=LeMotech+Waterproof+Dustproof+IP65  This box had an o-ring gasket around the lid and all four lid screws were outside the inner enclosure for weatherproofing the contents.

The link page screen clip is below.

OK let's look a little closer at the existing installation.  A bit of a mess...
The box was mounted too close to the toilet room fan lid.  A sharp cable bend and a cable clamp screwed into the roof was required to prevent interference with the fan lid.
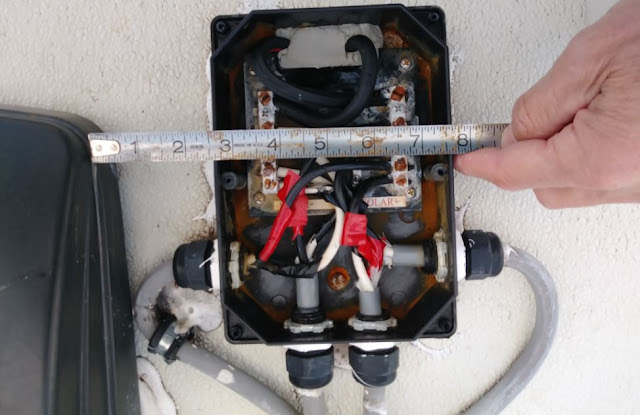
A view below with the lid removed.  The water has been removed from the interior of the box and it is dried out in this picture.
A little closer for additional detail.
Close in on the buss bars.  Note the significant corrosion.  Not abundantly visible are the wire strands that did not make the installation into the buss, they were frayed out.
The new box and cable gland assemblies.
Inside of new box.   Possibly visible is the white o-ring in the lid at right.  Note the integrated standoffs in the floor of the box interior at left.  We used these standoffs to mount the buss board.  Also the lid screws are designed outside of the weatherproof enclosure space preventing any water intrusion through the lid screws from getting to the box contents.
Below are the cable entrance glands that we found on Amazon, which fit the solar panel 10 AWG cables perfectly.
https://www.amazon.com/uxcell-Waterproof-Plastic-Adjustable-10mm-13mm/dp/B07DC7WHHD/ref=pd_rhf_pe_p_img_11?_encoding=UTF8&psc=1&refRID=5YTMRQG1MVAB7H1WNVZX
Below is a shot of the buss board we assembled.  The buss bars we found on Amazon and the plastic board was an RV bug-shield we found in the dumpster.  A little bit of cutting, filing and drilling and we had a perfect back board.  We mounted the board to the integrated box standoffs with three small stainless steel sheet metal screws which can be seen in the picture below.
A screen clip of the buss bars from Amazon below and a URL https://www.amazon.com/Square-Schneider-Electric-PK7GTACP-Terminal/dp/B002FQKSKO/ref=pd_day0_hl_60_5?_encoding=UTF8&pd_rd_i=B002FQKSKO&pd_rd_r=47fbe98b-0194-11e9-add8-73a0b1357621&pd_rd_w=cKWTW&pd_rd_wg=j0yHw&pf_rd_p=ad07871c-e646-4161-82c7-5ed0d4c85b07&pf_rd_r=32FJPJH31W9SW8D1TJ09&psc=1&refRID=32FJPJH31W9SW8D1TJ09
The terminal openings easily accommodated the 10 AWG stranded cables from the panels and were just large enough to accommodate the larger  stranded cable going down into the coach roof, 1/0 AWG I am guessing.
Beginning the existing box removal process.  First thing we did was disconnect the charge controller from the batteries, which was a re-settable 12V, 50 A fuse, and covered the panels with an opaque tarp.  Cables are removed from the buss and box in the picture below.  We had to cut the cables because the buss bars were frozen with corrosion.  New box at the ready for fit checking.  It was ironic how many tools and materials were required to deal with the two little boxes removal and replacement process.
A little closer on the buss bar corrosion damage.
Old box removed, caulk and butyl tape removal and clean up required.
A little closer in on the old footprint.
 Caulk cleaned off.
Closer in on the cleaned footprint.  There were three screws holding the old box down and one screw for the cable clamp to the right keeping one cable away from the fan lid.  We filled those existing screw holes with butyl tape and caulked over with Dicor self-leveling sealant.
Bottom of original box; lots of butyl tape.
Inside of original box, it's trash now.
Replacement box below.  Butyl tape applied to bottom of box, panel cables stripped and ready, buss bars standing by.
New box installed below.  We were very careful installing the stranded wires in the buss bars and think we got all of the wire strands into the buss holes.
We did a few things to combat moisture and corrosion in this new box.  First, we think this new box is truly weather-proof, the cable glands have rubber washers at the box/shoulder interface and the box lid includes an o-ring around the perimeter, we made a generous desiccant pack from an old handkerchief and silicon granules, we covered the stainless steel box mounting screws with butyl tape, and lastly we covered the buss and exposed wire ends with dielectric grease after they were securely fastened.
The desiccant pack fits nicely inside the box.
Ready to secure the lid below. 
 All the required tools and materials...
All cleaned up.  Good voltage on the busses.
The last detail was adding a new white cable loom.  The original black loom was damaged when previously removed and replaced during our year one roof replacement.  The original black loom had also become brittle from UV and was starting to come apart.  Perhaps the white color will endure a little longer, we will see.
We are getting a little better charging current now after replacement.  It was amazing that the system was still working as well as it was with the amount of water and corrosion inside the box.