We have been experiencing water intrusion into our AM Solar junction box on our 2013 Majestic for over three years that we know of. We added caulk to the lid screws and to the cable gland entrances, but still experienced water intrusion into the box. We finally decided to just replace the entire box when we opened it up this fall and found water right up to the buss plane. The corrosion was terrible and it was obvious that most of the box assembly was not suitable for cleanup and reuse. Our 2013 New Horizon Solar Option we believe was an AM Solar kit of four each 100 W solar panels and the Tristar MPPT-45 charge controller.
Below is the before photo of original AM Solar junction box on the roof.
After photo of the replacement junction box below. By assembling our own box parts, we saved about $70.
We believe that the original AM Solar box is found for $80 at
https://amsolar.com/rv-combiner-box/20-roof
We are unsure if the cable entrance glands come with the AM Solar box, but we know the cable glands on our original box did not have a rubber gasket or o-ring between the gland shoulder and the exterior box wall. We suspect that is where most of the water was getting into our original box. We also note that the AM Solar box did not have a o-ring gasket on the lid, which makes that box more of a dust-proof rather than a weather-proof enclosure.
Photo screenshot of AM Solar box for sale online below.
We found a generic project box on Amazon for $12. It turned out one of the four lid screws was missing upon delivery, and we wrote that in a review online. The seller immediately contacted us and provided a complete refund. That saved us about 1/3 of the cost for a completed new box assembly. The lid screws were zinc plated, so we just replaced all four with stainless steel screws from Ace Hardware. We found the box here
https://www.amazon.com/LeMotech-Waterproof-Dustproof-Universal-Enclosure/dp/B075X11CL6/ref=sr_1_5?s=hi&ie=UTF8&qid=1545005088&sr=1-5&keywords=LeMotech+Waterproof+Dustproof+IP65 This box had an o-ring gasket around the lid and all four lid screws were outside the inner enclosure for weatherproofing the contents.
The link page screen clip is below.
OK let's look a little closer at the existing installation. A bit of a mess...
The box was mounted too close to the toilet room fan lid. A sharp cable bend and a cable clamp screwed into the roof was required to prevent interference with the fan lid.
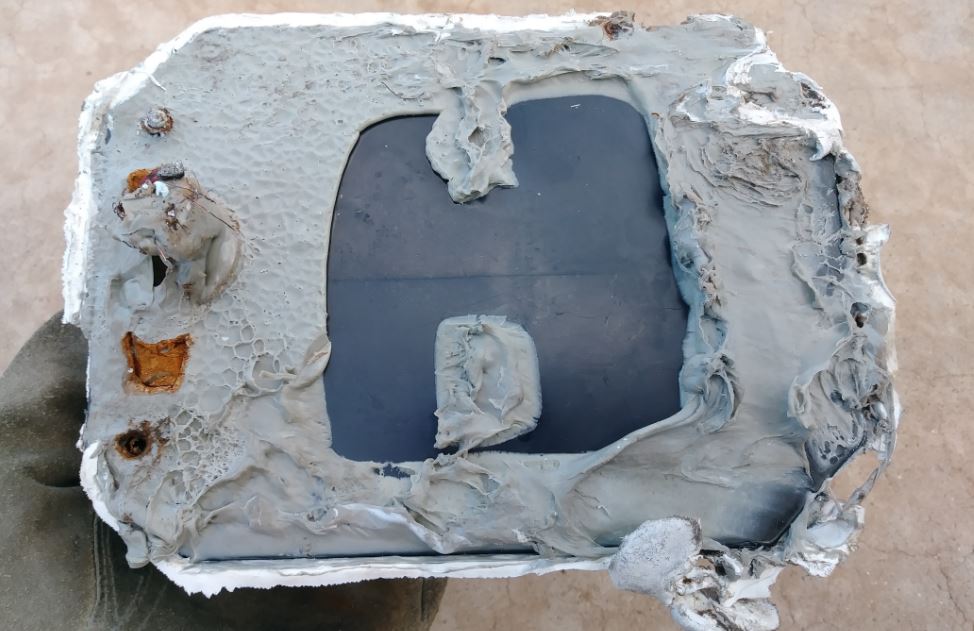
A view below with the lid removed. The water has been removed from the interior of the box and it is dried out in this picture.
A little closer for additional detail.
Close in on the buss bars. Note the significant corrosion. Not abundantly visible are the wire strands that did not make the installation into the buss, they were frayed out.
The new box and cable gland assemblies.
Inside of new box. Possibly visible is the white o-ring in the lid at right. Note the integrated standoffs in the floor of the box interior at left. We used these standoffs to mount the buss board. Also the lid screws are designed outside of the weatherproof enclosure space preventing any water intrusion through the lid screws from getting to the box contents.
Below are the cable entrance glands that we found on Amazon, which fit the solar panel 10 AWG cables perfectly.
https://www.amazon.com/uxcell-Waterproof-Plastic-Adjustable-10mm-13mm/dp/B07DC7WHHD/ref=pd_rhf_pe_p_img_11?_encoding=UTF8&psc=1&refRID=5YTMRQG1MVAB7H1WNVZX
Below is a shot of the buss board we assembled. The buss bars we found on Amazon and the plastic board was an RV bug-shield we found in the dumpster. A little bit of cutting, filing and drilling and we had a perfect back board. We mounted the board to the integrated box standoffs with three small stainless steel sheet metal screws which can be seen in the picture below.
A screen clip of the buss bars from Amazon below and a URL
https://www.amazon.com/Square-Schneider-Electric-PK7GTACP-Terminal/dp/B002FQKSKO/ref=pd_day0_hl_60_5?_encoding=UTF8&pd_rd_i=B002FQKSKO&pd_rd_r=47fbe98b-0194-11e9-add8-73a0b1357621&pd_rd_w=cKWTW&pd_rd_wg=j0yHw&pf_rd_p=ad07871c-e646-4161-82c7-5ed0d4c85b07&pf_rd_r=32FJPJH31W9SW8D1TJ09&psc=1&refRID=32FJPJH31W9SW8D1TJ09
The terminal openings easily accommodated the 10 AWG stranded cables from the panels and were just large enough to accommodate the larger stranded cable going down into the coach roof, 1/0 AWG I am guessing.
Beginning the existing box removal process. First thing we did was disconnect the charge controller from the batteries, which was a re-settable 12V, 50 A fuse, and covered the panels with an opaque tarp. Cables are removed from the buss and box in the picture below. We had to cut the cables because the buss bars were frozen with corrosion. New box at the ready for fit checking. It was ironic how many tools and materials were required to deal with the two little boxes removal and replacement process.
A little closer on the buss bar corrosion damage.
Old box removed, caulk and butyl tape removal and clean up required.
A little closer in on the old footprint.
Caulk cleaned off.
Closer in on the cleaned footprint. There were three screws holding the old box down and one screw for the cable clamp to the right keeping one cable away from the fan lid. We filled those existing screw holes with butyl tape and caulked over with Dicor self-leveling sealant.
Bottom of original box; lots of butyl tape.
Inside of original box, it's trash now.
Replacement box below. Butyl tape applied to bottom of box, panel cables stripped and ready, buss bars standing by.
New box installed below. We were very careful installing the stranded wires in the buss bars and think we got all of the wire strands into the buss holes.
We did a few things to combat moisture and corrosion in this new box. First, we think this new box is truly weather-proof, the cable glands have rubber washers at the box/shoulder interface and the box lid includes an o-ring around the perimeter, we made a generous desiccant pack from an old handkerchief and silicon granules, we covered the stainless steel box mounting screws with butyl tape, and lastly we covered the buss and exposed wire ends with dielectric grease after they were securely fastened.
The desiccant pack fits nicely inside the box.
Ready to secure the lid below.
All the required tools and materials...
All cleaned up. Good voltage on the busses.
The last detail was adding a new white cable loom. The original black loom was damaged when previously removed and replaced during our year one roof replacement. The original black loom had also become brittle from UV and was starting to come apart. Perhaps the white color will endure a little longer, we will see.
We are getting a little better charging current now after replacement. It was amazing that the system was still working as well as it was with the amount of water and corrosion inside the box.


If the UV eats away at the white sheathing over the cables, use white Halar its UV resistant.
ReplyDeleteThank you Big Dog!
ReplyDelete