Even though we are only half way through the month, we have had enough excitement & challenges for a few months! We long for the sunshine of southern Arizona in the desert right about now. This building a house business as your own general contractor is a serious challenge. We think and hope this will be the last time we attempt this. We are still very excited to finish this project and move in and finally use the place that we have put so much of ourselves into; no regrets there. We are beat down and exhausted some days and just want the building adventure to be over! We have had much good progress this month and expect more before Christmas and even more right after New Year Day. We can see the finish line coming over the horizon finally. It is still a ways off, but much closer than it has been.
This is what we should be doing, but thanks to our neighbor Cory
Nielsen for capturing this awesome local Swan Valley image. As you can
imagine from this picture, we have had our fair share of snowfall and
cold temperatures here, and only half way through December 😮

Rather, what we have been busy doing in the first part of December is chasing leaks in our DWV (Drain-Waste-Vent) plumbing system. The shot below is the kitchen drain-vent. We installed it initially, but the inspector wanted us to install the drain pipe in the walls not through the floor where it was easily accessible, protected from the exterior cold and didn't leak. We hired a local professional plumbing company to do the tricky install in the wall. The inspector didn't pass their first attempt either, they didn't like the pipe sizing. So the plumber reinstalled the system with the larger drain pipe, 2". Passed inspection, but now it leaks under the pressure test. Plumber came back three more times on that install before it was finally complete, passed inspection and didn't leak. Including our effort that was five tries on this area of our drain system. We had to rip out the plastic and insulation so the plumber could get back in there and do the last rework. You may start to see why we may remember this December for a few more days...

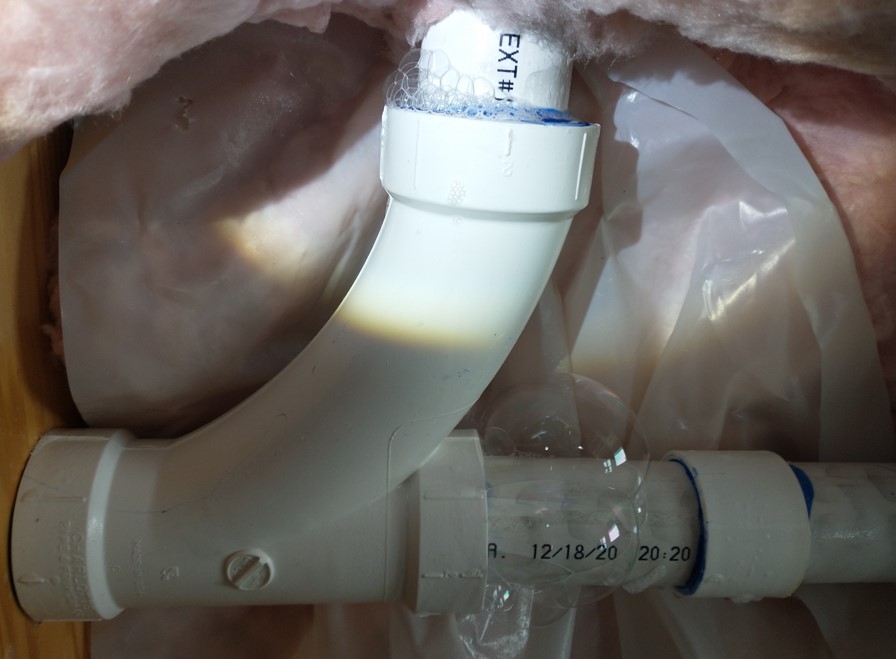
Below is one of the leaks that we found in the DWV system, this one is part of the kitchen area. When we pressurized the system, we knew there was a leak or leaks somewhere because the system would lose pressure in an hour or less. We found one leak, fixed that, then realized there was another. Finally we just tested every DWV joint; I guess there are near 100 joints, some really hard to get at for test. The test is to pressurize the system then spray soapy water on the joint. If you see bubbles growing that is a leak. We are proud to report that we did not find a single leak in any of the joints that we installed and glued, and we installed 90% of the system. It was just the professionally installed fittings that gave us a fit!
Another leak, also part of the kitchen. Gotta fix that!
Below is a shot of a clean out, which is required here on all drains. We didn't know that, so didn't initially install them. The plumber we hired did this for us. They installed about 8 of these fittings of which 3 leaked and had to be replaced.
Same clean out, you can see the pressurization set up we used in the background.. The pressurization input was at this drain for the utility sink in the guest bath/laundry room.
Plumbers Eric & Brendon go at the last and successful refit of the kitchen area.
All put back together. Gari still has on her respirator from replacing the insulation. There, wasn't that easy? We did that with three pictures haHahA (crazy person laugh)!
Not so fast, we still had not leaked checked all the fitting joints in the attic on the vent system, so we went up there with our soapy water spray bottle on a Friday morning 12/9. Coincidentally we had a pretty good snow storm roll through on the Thursday night before. Then within a few minutes of being up in the attic I noticed this... See the snow accumulating at the roof ridge? NOT Good!

The storm had 50 mph wind gusts and lots of fine as powder snow flakes. We believe this is what forced the snow through any tiniest of cracks, and we believe some still exist in the roof ridge vent system.... obviously. Once the snow passed the ridge vent and was inside the building, it pretty much fell straight down from the roof ridge. The vertical member in the picture below is the roof truss kingpost that goes straight up to the roof ridge. You can see the snow on the diagonal truss brace and I scooped a handful of snow off of the face of the fiberglass insulation. The insulation is a bright white so it is hard to see the snow on it, but it is there.
The snow fell on everything right below the ridge, the wires, the electrical boxes the pipes and ducts.
Gari looks up at the ridge vent in over the garage. Snow entered at every single roof panel bay in the garage and in more than half of the roof panel bays over the house area. A real gut punch when we discovered it!
It is difficult to see up in the ridge what is going on in each roof panel bay because of the location (10 ft up) and because of the small clearance of about 1 inch. We stuffed the camera up in that gap and got this photo below. Obviously light is coming in abundantly at the joint formed at the interface of the roof panel standing seam and the Z-metal installed to fill the gap. That joint should have sufficient caulk at installation so as no gap remains and will block any and all wind driven snow or moisture. Doesn't look sealed very well to us. We are in discussion with the installing contractor.

Zooming out, the shot below shows a section of roof ridge above the house. Now that the attic is closed in with insulation, it is much darker up there and we could see this light much better, which we had missed before when this area was all open and much lighter up there. Several of the bays obviously have light entering, suggesting gaps may exist. This is where the snow entered at the joint of the standing seam to Z-metal at many of the roof panel bays.

We developed a plan. The first thing we could implement was to install the left over vapor barrier on either side of the truss king posts. The plastic extends about 4 foot on either side of the kingpost or roof ridge. We made a swale in the plastic on each side of the kingpost so it would capture and snow or other moisture that may enter the attic in the future and keep it out of the insulation. The second part of our plan is to install additional horse hair or hog hair air filter media in each roof panel bay to further fill any existing gaps there. The ridge vents are constructed with this same filter media, we are just going to stuff more in there. The last phase is to remove a few of the roof ridge caps, inspect the standing seam to Z-metal joints for proper caulk and butyl tape on the bottom flange of the Z. If more than one joint is inadequate, we have asked the installer to remove all ridge caps and correct all joints under workmanship warranty. If the sample of 2 or 3 ridge caps removed all looks good we will pay for the sample inspection. We will see how that proposal works...

Friday was spent removing snow with a 5 gallon bucket. We removed as much as we could on Friday. We were so upset we gave out early that Friday.
After a good rest overnight we were re-energized and went back at it on Saturday. Upon entering the house we noticed this in one of our large picture windows. It looked like a .22 round. Upon further investigation we think it was from a pellet air gun. Right after discovering the attic snow the day before we were not prepared for this. It was hard to get over the idea that someone was shooting directly at our house. Either intentionally or unintentionally didn't seem to make much difference. We called the sheriff and a deputy came out, performed an investigation and made a report. So now we wait and we watch.
We have figured out that we can just replace the glass... for $1200. We have filled the hole with silicone caulk until we can make the repair.
Now back to good progress. The drywall arrived one snowy overcast day last week. Jose operates the squirt boom crane on the delivery truck with his wireless remote control panel. He was good with the crane.
He brought the boom and payload right to the front door and they transferred the sheetrock over to a dolly at the door.
They had one load get away from them when transferring the sheets. It knocked the cart off of the ramp at the door and slammed against the door. After inspecting things it appears that we avoided any damage. That stuff is heavy!
The guys loaded the appropriate number of sheetrock bundles into each room to make it easy for the installers.
A couple days later the installers showed up. Luis, the team lead, gives me the thumbs up from his drywall stilts as I capture some documentation. The guy on the bucket actually walked across the floor without getting off of the bucket. Now we have seen these high up workers walk on step ladders and now buckets! Luis was a great guy and the crew was very nice and they did a neat job hanging everything. One guy worked in a Santa Claus hat and fuzzy white collar! They completed the hanging task in a day and a half. We expect them to return this week to start the tape, mud & texture.
Luis and helper on our scaffold hanging the heavy stuff on the garage ceiling.
I am bigger than Luis, but I don't believe that I could do what he does! He has some serious power and technique in his smaller frame.
All hung out. Really starting to look like a house now. Inconvenient though, we can no longer walk through the walls. Sitting room looking east toward Mt Baldy and the lake. You can just see the gas log stub out in the corner coming out of the floor.
Looking at the kitchen sink area. You can see the drain pipe below the window. The wires protruding from the walls will be over cabinet accent lights and under cabinet work lights.
Looking at the oven and refrigerator wall. You can see the stove vent hood duct up high frame center, and the refrigerator ice maker connection at frame left low.
Guest bedroom looking back out the door and at the closet.
Guest bathroom/laundry room. You can just see the dryer vent at frame left low. The toilet will be tucked in the nook behind the shower/tub, past that will be a little closet nook to hang clothes as they come out of the dryer.
Guest bath looking back out the door; l to r: lav, utility sink; washer is just out of frame to the right, but you can just see the washer electrical outlet at frame right.
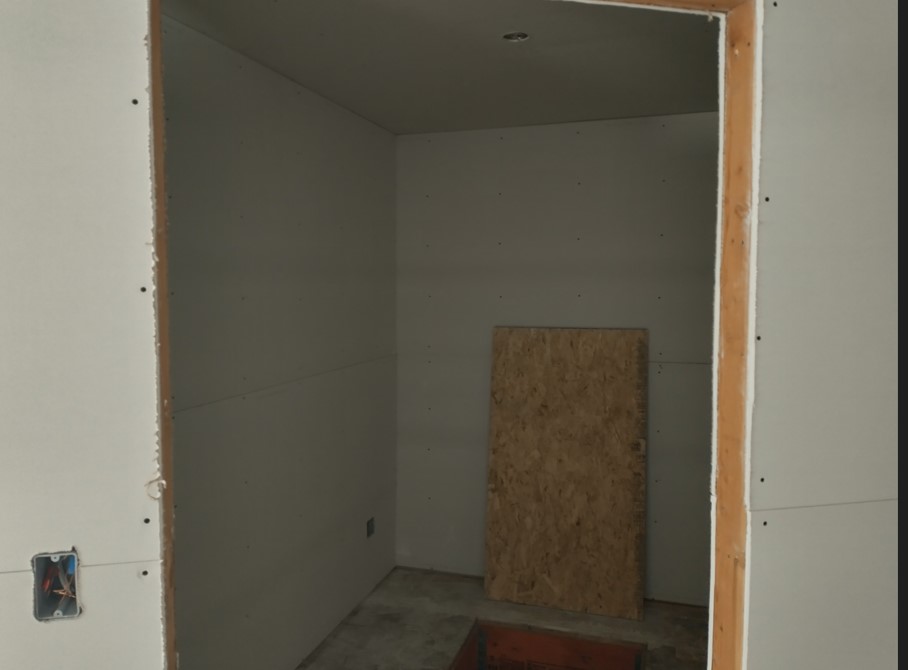
Looking into the pantry. First room in the hall next to kitchen. You can see the crawlspace access opening in the floor.
Master bedroom looking from just inside the master bath door.
Master Bath. One person sauna planned for the right corner. Toilet will be tucked behind the shower wall to the left. Lavs are just out of frame to the right - across from the shower.
Entry hall from garage. Thermostat wire at left, followed by guest bed, then guest bath. On the right is the utility closet (water heater), then the coat closet, and at the end of the hall is the door out into the garage. The pantry is just before the thermostat wire at the left just out of frame. The master bedroom door is just out of frame at right.
Garage drywall. The installers only hung the ceiling and the firewall in the garage. We will install OSB sheathing to the other 3 walls. We already have a few sheets up on the south wall from the framing leftovers. You can see the attic access hatch in the ceiling. This is the only attic access point. The outlet box by the attic access is for a ceiling fan.

A view out our front yard looking east toward Mt. Baldy, Sheep Mt, and the Palisades Reservoir. It's cold here. I should add that our kitchen cabinets arrived a week ago, so as soon as the drywall is finished and we can get the paint applied we will have the kitchen and bathroom cabinets installed. Final electrical devices and fixtures as well as final plumbing fixtures can then also be installed. That should keep us busy for a week or more. Still remaining is the trim, baseboard, doors and windows. We have the interior doors on order. Finally there is the matter of the flooring. We are planing to install plank vinyl ourselves. That should be an adventure in and of itself. We also have a plan for a little tile work; at the front door entry and under the gas log in the corner of the sitting room.
Another gorgeous shot from neighbor Corey. Wishing a Merry Christmas to all and all the best in the New Year. We can all be saved through Jesus Christ!


Looking good Steve - a lot of work!! Merry Christmas!!
ReplyDeleteThank you Bill, Merry Christmas brother!
ReplyDelete